Creating your own chat app is a fun way to learn how to create chat app for Android phones. Android Studio is a special program made by Google that helps you build these apps, and you can use it even if you’re a beginner. This easy-to-follow guide will show you the simple steps to create chat app with Android Studio. By the end, you’ll have everything you need to start your journey into the world of making apps!
Create Chat App in Android Studio: Step-By-Step
In this article, we’ll show you how to create chat app using Android Studio. Before we start, make sure you have Android Studio installed on your computer. Our goal is to create a video chat app like WhatsApp or Facebook Messenger, where you can have group chats or chat with just one person at a time. But we’ll go even further – you’ll be able to add video and voice calls! You’ll also have the power to block users who misbehave, either by banning their accounts or even their internet addresses. And the best part? You can control everything about your chat app using Openfire XMPP Server.
Contents of Article
Android Chat App Features
It’s most important to discuss Android application features that we want to create in the Android studio. It has more features but we will describe some most popular features.
- Group Create and Join
- Audio And Video Call
- Send File and Image
- User Status
- User Presence
- Block User
Step 1. What You Need To Create Chat APP
- Android Studio: This is the main program you’ll use to build your chat app.
- VPS (Virtual Private Server): You’ll need this to handle the video chat part of your app so it can work smoothly for everyone using it.
Step 2. Setup Android Studio Project
First, We need an Android Studio project to create chat app. Many free Projects are available on GitHub with GNU General Public License v3.0. Therefore, we can make modifications, which are also free for commercial use. So, We will use the Android studio project as one of them. The most popular Android studio project links are given below.
Conversations ( Group and One To One Chat )
Xabber-Android ( Group and One To Chat like WhatsApp)
A Talk-Android ( Audio and Video Call )
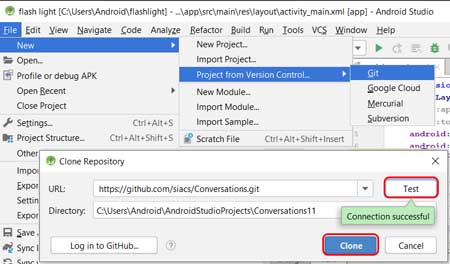
So, we will clone the first project and change the package name in the Android studio. Open the project link in a new tab and copy the Clone or download link and paste it into an Android studio like this.
Once our project is downloaded then we will change the Android chat app package name. In addition, You also need to change your database server domain name from the Config.Java file. So, the guideline is shown in the following screenshot.

Step 3. Install Openfire Chat Server On VPS (Virtual Private Server)
- It’s a more important step to create chat app because it’s a chat server.
- Simply follow this article How To Install Openfire On Ubuntu Guidline to install it.
Step 4. Setup Openfire XMPP Chat Server
Once our Openfire XMPP Server is installed on Ubuntu, we need an important setting in Openfire. So, we will install Openfire plugins from the Admin Panel for our Android Chat application. You must install the following Plugins from the Plugins Option in the Openfire Admin Panel. Many plugins are available, but we will install the most useful one for an Android chat application.
- Registration ( User Registration Service Plugin )
- HTTP File Upload ( Images and File Sending )
- Jingle Nodes Plugin ( For Video and Audio Calls)
- Monitoring Service
- MUC Service ( For Group Chat )
- Avatar Resizer ( Profile Pic )
- Bookmarks ( A Group chat Bookmarks For Every New User & user bookmarks)
- Presence Service
- STUN server plugin ( Video Calling )
- User Status Plugin ( Trace User IP In-Database )
- Content Filter ( Bad Words Filter )
Step 5. Setting Jingle Nodes Port For Video Calls
Suppose you want to make a video call application in Android Studio. So, We need to install the Jingle Nodes Plugin. In addition, We also need to set up Jingle Nodes Ports. Therefore, the Ports setting is shown in the following screenshot.

Once you have completed the jingle nodes setting, your video call will work properly. If any problem occurs, then you need to install Turn Server on Ubuntu VPS. In addition, the installation process for the Turn Server on Ubuntu is given below.
Step 6. Install Turn Server For Video Call Connection
Now, Open your Ubuntu terminal window using Putty with root and run the following command.
sudo apt-get update
sudo apt-get install coturn
Run the following command to enable Turn Server.
sudo sed -i '/TURNSERVER_ENABLED/c\TURNSERVER_ENABLED=1' /etc/default/coturn
Once the turn server is installed and enabled, we need some settings for video calling. It is simple: run the following command to open the configuration setting file.
sudo nano /etc/turnserver.conf
Set up your Turn Server setting like this.
listening-port=3478

tls-listening-port=5349
listening-ip=185.XX.XXX.XXX   (put here your ip)

relay-ip=185.XX.XXX.XXX    (put here your ip)

fingerprint

lt-cred-mech

realm= your domain  name

total-quota=100

stale-nonce


cert=/ssl/nws.crt     #( your ssl certification path ) #
 pkey=/ssl/nws.pem
also set cipher-list="ECDH+AESGCM:DH+AESGCM:ECDH+AES256:DH+AES256:ECDH+AES128:DH+AES:ECDH+3DES:DH+3DES:RSA+AES:RSA+3DES:!ADH:!AECDH:!MD5"

 no-loopback-peers

no-multicast-peers
service coturn restart
or
/etc/init.d/coturn restart