
Install NextCloud On Ubuntu With Apache2
Want to manage your audio, video calls, and cloud storage all in one place? NextCloud is a great solution, and you can install it on Ubuntu with Apache2 server easily. Don’t worry, you don’t have to be a web developer to do it! First things first, you’ll need a LAMP Stack on your Ubuntu VPS. Not sure what that is or how to install it? No problem! Check out our straightforward guide titled ‘How to Install LAMP Stack on a VPS Server‘ to get started. With these steps, you’ll have NextCloud up and running in no time.
Step 1: Download NextCloud Zip File
After installing the LAMP Stack on your Ubuntu Server. Now, we need to Download the NextCloud Zip file from the Official Website to install Nextcloud on our server. So, We will run the following command to download in our root directory /var/www/html. Therefore, we need to go to our root directory and run the download command.
cd /var/www/html
Now, We will download the NexCloud Zip File In our root directory by running the following command. You can also copy the link from the official website.
wget https://download.nextcloud.com/server/releases/nextcloud-15.0.4.zip
After Downloading the NextCloud zip file in our Ubuntu root directory. Now, We will run the following command to install NextCloud on our Ubuntu server.
unzip nextcloud-15.0.4.zip
After unzipping the file, you can see there is an available NextCloud folder by running the following command.
ls

Now, We will remove the zip file by using the following command.
rm nextcloud-15.0.4.zip
We will give website data permission to our NextCloud directory by running the below command. It is important permission.
sudo chown -R www-data:www-data /var/www/html/nextcloud

 sudo chmod -R 755 /var/www/html/nextcloud/
Step 2: Create Apache2 Virtual Host To Install NextCloud
We Will create an Apache2 virtual host to install NextCloud website. So, We will create a new file by running the following command.
sudo nano /etc/apache2/sites-available/nextcloud.conf
Copy and Paste the following code in the new open file. Don’t forget to change your domain name.
<VirtualHost *:80>
ServerAdmin admin@example.com
 DocumentRoot /var/www/html/nextcloud/
 ServerName example.com
ServerAlias www.example.com
 Alias /nextcloud "/var/www/html/nextcloud"
<Directory /var/www/html/nextcloud>
 Options +FollowSymlinks
 AllowOverride All
 Require all granted
<IfModule mod_dav.c>
 Dav off
  </IfModule>
 SetEnv HOME /var/www/html/nextcloud
  SetEnv HTTP_HOME /var/www/html/nextcloud
 </Directory>
 ErrorLog ${APACHE_LOG_DIR}/error.log
 CustomLog ${APACHE_LOG_DIR}/access.log combined </VirtualHost>
Step 3: Enable NextCloud Virtual Host and Apache2 Rewrite Module
After creating a new virtual host, enable it by running the following commands
sudo a2ensite nextcloud.conf
 sudo a2enmod rewrite
sudo a2enmod headers
sudo a2enmod env
Restart the Apache web server
Now, We need to restart apache2 by running the following command
sudo service apache2 restart
Step 4: Create a Database
We need a database to install NextCloud on Ubuntu. So, We will make a database for our NextCloud website by running the following commands.
To login database
sudo mysql -u root -p
Then create a new database for Nextcloud
CREATE DATABASE nextcloud;
Make a new user with the name of nextclouduser with your new password.
CREATE USER 'nextclouduser'@'localhost' IDENTIFIED BY 'new_password';
Grant the user to access your database
GRANT ALL ON nextcloud.* TO 'nextclouduser'@'localhost' IDENTIFIED BY 'user_password_here' WITH GRANT OPTION;
Flush and exit
FLUSH PRIVILEGES;
EXIT;
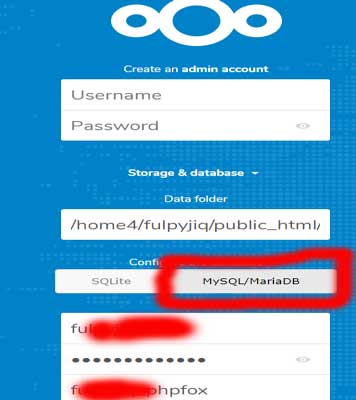
Step 5: NextCloud Database Configuration Setting
Now, visit your domain then you will see the NextCloud database configuration setting page. So simply enter your database information hit the setup button and your admin user with a password to log in to NextCloud.Like this
Increase PHP File Upload Setting
Finally, We will increase our file uploading size by running the below command
sudo nano /etc/php/7.0/apache2/php.ini
Now, Setup your PHP.in the file setting like this
file_uploads = On
allow_url_fopen = On
memory_limit = 256M
upload_max_filesize = 210M
max_execution_time = 350
In Conclusion: We hope, You will Install NextCloud On Ubuntu with the apache2 server. In our next article, We will discuss how to set up a video and audio call on NextCloud.

