
Install WordPress Website On Ubuntu With LAMP Stack
Are you looking to install WordPress Website on Ubuntu Server to start your website or blog on Ubuntu Server? Then You come to the right place. This simple guide will walk you through how to install WordPress Website, the world’s most popular content management system, on an Ubuntu server.
Step 1: Install LAMP Stack On Ubuntu Server
First, We need a LAMP stack on our virtual private server to install WordPress website. In the previous article, We discussed installing a LAMP stack on Ubuntu Server. So, You need to install LAMP Stack by following our guidelines in How to install Apache, PHP, and MySql OR LAMP Stack Ubuntu.
Step 2: Download the WordPress Zip File
After installing the LAMP stack on your Ubuntu server, you must download the WordPress Zip file into your website root directory. So, We will create a root directory and download the WordPress Zip file to install WordPress Website on Ubuntu. Please open Putty in your window and
Now, We need to download the WordPress zip file to install WordPress Website on Ubuntu. So, We will go into our Website root directory by running the following command.
cd /var/www/html
Now, We will run the following command to download the WordPress Zip file into our website root directory. You can also get the latest version link from WordPress official Website.
wget https://wordpress.org/latest.zip
Now, We will unzip the WordPress file using the following. If the zip is not installed on your server, you can also install zip by running the zip install command; otherwise, ignore it and unzip your WordPress file.
apt-get install zip unzip

sudo unzip latest.zip
Our website root directory will be /var/www/html/wordpress. We need to give permission to website data to this directory by running the following commands.
sudo chown -R www-data:www-data /var/www/html/wordpress/

sudo chmod -R 755 /var/www/html/wordpress/
Step 3: Create an Apache2 Virtual Host For WordPress
We need an Apache2 Virtual Host Configuration file for the Website. So, Please run the following commands to create a virtual host configuration file to install WordPress website on Ubuntu.
sudo nano /etc/apache2/sites-available/wordpress.conf
Copy and paste the following codes. Don’t forget to change your domain name.
<VirtualHost *:80>
	ServerAdmin admin@example.com
	ServerName  example.com

	# Indexes + Directory Root.
	DirectoryIndex index.php index.html
	DocumentRoot /var/www/html/wordpress/

	# BEGIN WordPress
	<IfModule mod_rewrite.c>
		RewriteEngine On
		RewriteRule ^index\.php$ - [L]
		RewriteCond $1 ^(index\.php)?$ [OR]
		RewriteCond $1 \.(gif|jpg|png|ico|css|js)$ [NC,OR]
		RewriteCond %{REQUEST_FILENAME} -f [OR]
		RewriteCond %{REQUEST_FILENAME} -d
		RewriteRule ^(.*)$ - [S=1]
		RewriteRule . /index.php [L]
	</IfModule>
	# END wordpress

	Options FollowSymLinks
	Order allow,deny
	Allow from all
</VirtualHost>
Now, We will enable the Apache2 virtual host for our website by running the following commands.
sudo a2ensite wordpress.conf
sudo a2enmod rewrite
sudo a2enmod headers
sudo a2enmod env
sudo a2enmod dir
sudo a2enmod mime
After that, We need to restart Apache2 by running the following command.
sudo service apache2 restart
Step 4: Create a Database for the Website On Ubuntu
Finally, We need to create a database to install WordPress website. So, simply run the following command to log in to the MySql database and enter your root password.
sudo mysql -u root -p
Step 1: Crease Database
After login, Create a new database by running the following command.
CREATE DATABASE wordpress;
Step 2: Create a User for the Database
We will create a user name for our Database by running the following command.
CREATE USER 'wordpressuser'@'localhost' IDENTIFIED BY 'your-new-password';
Step 3: Give permission user for Database
We will give permission to the WordPress user for our database by running the following commands.
GRANT ALL ON wordpress.* TO 'wordpressuser'@'localhost' IDENTIFIED BY 'user_password_here' WITH GRANT OPTION;

FLUSH PRIVILEGES;

EXIT;
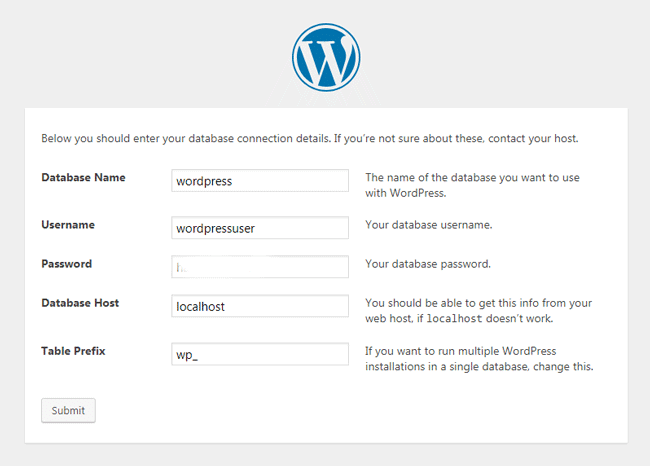
Step 5: Database Configuration Setup
Finally, open your website URL in the browser and fill in the database information to install WordPress website.
Step 5: Increase PHP Upload File Size
Finally, We Need to increase our PHP file Upload setting. If you do not increase your file upload size, you won’t be able to upload a theme or Plugin. So Please Run the Following command and set the following setting in your php.ini file.
sudo nano /etc/php/7.0/apache2/php.ini
 file_uploads = On
allow_url_fopen = On
memory_limit = 256M
upload_max_filesize = 200M
max_execution_time = 370
After completing all the steps, you must reboot your Ubuntu Server by running the following command.
reboot
FAQ’S
How to Install WordPress Website from Terminal?
wget and unzip it to the web directory. After that, create a MySQL database and user for WordPress. Finally, configure the wp-config.php file with your database details by running the WordPress installation script by browsing your domainHow to Install a WordPress Theme on Ubuntu?
How Do I Manually Install a Theme in Ubuntu?
How to Install WordPress Website?
In Conclusion, We Hope You will have a Website on the Ubuntu Server by following our team guidelines. If you are facing any problems, you can also comment on this post. We will try to reply to your question as soon.

