
Make Flashlight Application in Android Studio: A Beginner’s Guide
Are you interested in Android app development and looking for a simple project? Make flashlight application in Android Studio is a great way to begin. This guide will walk you through the steps in an easy-to-understand method, making it perfect for beginners. We will cover How to make flashlight application using Android Studio. In this post, we will create a flashlight application for Android mobile using an Android studio step by step; therefore, If you follow my guidelines carefully, you will make your own Android flashlight application with an easy method.
What You Need To Make Flashlight App
We need the following things to make a flashlight application for Android mobile.
- A computer with Android Studio installed.
- Basic knowledge of Java or Kotlin programming languages.
Step 1: Setting Up Project To Make Flashlight App
We need an Android Studio project to make flashlight application for Android mobile.
- Launch Android Studio and create a new project.
- Choose the ‘Empty Views Activity‘ template with Java language.
- Name your project, for instance, ‘FlashlightApp.’
- Complete the project setup with the default settings.
Step 2: Adding Permissions in AndroidManifest File
First, you need camera permission in the Manifest.xml file to make flashlight application. Therefore, we will add camera permission to our Android studio manifest.XML file. So, Copy and paste following permissions into your AndroidManifest file
<uses-permission android:name="android.permission.CAMERA" />
<uses-feature android:name="android.hardware.camera" />
<uses-permission android:name="android.permission.FLASHLIGHT"/>
Step 3: Designing the User Interface
- Open the
activity_main.xmlfile. - Use the drag-and-drop feature to add a Button to your layout.
- Customize the Button’s text, such as “Turn ON/OFF”.
Follow Step 4 to design your flashlight app with the Turn ON/OFF button.
Step 4: Update Activity_Main.xml File For Designing App
We need a user interface design with a Turn ON/OF button for Flashlight. So, simply open your existing activity_main.xml file and replace the complete code with the following code.
<?xml version="1.0" encoding="utf-8"?>
<RelativeLayout xmlns:android="http://schemas.android.com/apk/res/android"
    android:layout_width="match_parent"
    android:layout_height="match_parent">

    <Button
        android:id="@+id/Flash"
        android:layout_width="144dp"
        android:layout_height="83dp"
        android:layout_centerInParent="true"
        android:background="#F0EC1907"
        android:text="ON" />


</RelativeLayout>
Step 5: Update MainActivity.java Coding the Flashlight Feature
- In your main activity file (Java or Kotlin), write the code to access the device’s camera and flash.
- Add code to turn the flash on and off when clicking the button.
- Handle exceptions for devices without a flash.
We need flashlight app programming coding to make flashlight. So, simply copy and replace the following code with your existing MainActivity.java file code without your package name. Like ScreenShot
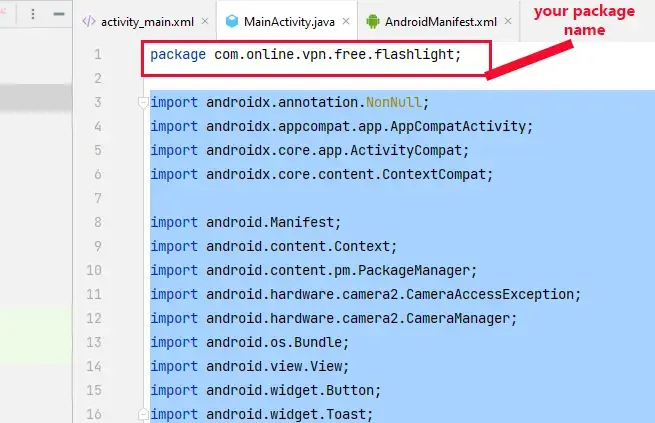
import androidx.annotation.NonNull;
import androidx.appcompat.app.AppCompatActivity;
import androidx.core.app.ActivityCompat;
import androidx.core.content.ContextCompat;

import android.Manifest;
import android.content.Context;
import android.content.pm.PackageManager;
import android.hardware.camera2.CameraAccessException;
import android.hardware.camera2.CameraManager;
import android.os.Bundle;
import android.view.View;
import android.widget.Button;
import android.widget.Toast;

public class MainActivity extends AppCompatActivity {

    Button FlashLight;
    private static final int CAMERA_PERMISSION_CODE = 100;
    boolean hasCameraFlash = false;
    private boolean isFlashOn=false;

    @Override
    public void onCreate(Bundle savedInstanceState) {
        super.onCreate(savedInstanceState);
        setContentView(R.layout.activity_main);

        hasCameraFlash = getPackageManager().
                hasSystemFeature(PackageManager.FEATURE_CAMERA_FLASH);

        FlashLight = findViewById(R.id.Flash);

        FlashLight.setOnClickListener(new View.OnClickListener() {
            @Override
            public void onClick(View view) {
                askPermission(Manifest.permission.CAMERA,CAMERA_PERMISSION_CODE);

            }
        });
    }

    private void flashLight() {
        if (hasCameraFlash) {
            if (isFlashOn) {
                FlashLight.setText("ON");
                flashLightOff();
                isFlashOn=false;
            } else {
                FlashLight.setText("OFF");
                flashLightOn();
                isFlashOn=true;
            }
         } else {
            Toast.makeText(MainActivity.this, "No flash available on your device",
                    Toast.LENGTH_SHORT).show();
        }
    }

    private void flashLightOn() {
        CameraManager cameraManager = (CameraManager) getSystemService(Context.CAMERA_SERVICE);

        try {
            String cameraId = cameraManager.getCameraIdList()[0];
            cameraManager.setTorchMode(cameraId, true);
        } catch (CameraAccessException e) {
        }
    }

    private void flashLightOff() {
        CameraManager cameraManager = (CameraManager) getSystemService(Context.CAMERA_SERVICE);
        try {
            String cameraId = cameraManager.getCameraIdList()[0];
            cameraManager.setTorchMode(cameraId, false);
        } catch (CameraAccessException e) {
        }
    }

    private void askPermission(String permission,int requestCode) {
        if (ContextCompat.checkSelfPermission(this,permission)!= PackageManager.PERMISSION_GRANTED){
            // We Dont have permission
            ActivityCompat.requestPermissions(this,new String[]{permission},requestCode);

        }else {
            // We already have permission do what you want
            flashLight();
        }

    }

    @Override
    public void onRequestPermissionsResult(int requestCode, @NonNull String[] permissions, @NonNull int[] grantResults) {
        super.onRequestPermissionsResult(requestCode, permissions, grantResults);
        switch (requestCode) {
            case CAMERA_PERMISSION_CODE:
                if (grantResults.length > 0 && grantResults[0] == PackageManager.PERMISSION_GRANTED) {
                    hasCameraFlash = getPackageManager().
                            hasSystemFeature(PackageManager.FEATURE_CAMERA_FLASH);
                    Toast.makeText(this, "Camera Permission Granted", Toast.LENGTH_LONG).show();
                    flashLight();

                } else {
                    Toast.makeText(this, "Camera Permission Denied", Toast.LENGTH_LONG).show();
                }
                break;
        }
    }}
Step 6: Update Turn ON/OFF Button Images For the Flashlight App
If you want to use image buttons to make flashlight app awesome design. Note don’t change the image’s name because the programming code works with these names.
1. Please download the following Turn ON/OFF Button Images and import them into the Resource Manager > drawable folder.


2. After importing button images, update the Button view to ImageView in the activity_main.xml file with the following code
<?xml version="1.0" encoding="utf-8"?>
<RelativeLayout xmlns:android="http://schemas.android.com/apk/res/android"
    android:layout_width="match_parent"
    android:layout_height="match_parent">

    <ImageView
        android:id="@+id/Flash"
        android:layout_width="wrap_content"
        android:layout_height="wrap_content"
        android:layout_centerInParent="true"
        android:src="@drawable/btn_off"
        />


</RelativeLayout>
3. Now, we need to update the Flashlight programming file MainActivity.java
Change Button FlashLight; to ImageView FlashLight; code is available below the public class MainActivity extends AppCompatActivity {
4. Replace the programming code when the flashlight Turn ON/OFF, and then the button change according to this. Replace the following code with a new one
Existing code
private void flashLight() {
        if (hasCameraFlash) {
            if (isFlashOn) {
                FlashLight.setText("ON");
                flashLightOff();
                isFlashOn=false;
            } else {
                FlashLight.setText("OFF");
                flashLightOn();
                isFlashOn=true;
            }
         } else {
            Toast.makeText(MainActivity.this, "No flash available on your device",
                    Toast.LENGTH_SHORT).show();
        }
    }
Replace with the following code
@SuppressLint("UseCompatLoadingForDrawables")
    private void flashLight() {
        if (hasCameraFlash) {
            if (isFlashOn) {
                FlashLight.setImageDrawable(getResources().getDrawable(R.drawable.btn_on));
                flashLightOff();
                isFlashOn=false;
            } else {
                FlashLight.setImageDrawable(getResources().getDrawable(R.drawable.btn_off));
                flashLightOn();
                isFlashOn=true;
            }
         } else {
            Toast.makeText(MainActivity.this, "No flash available on your device",
                    Toast.LENGTH_SHORT).show();
        }
    }
Step 7: Testing Your App
- Run your app on your real mobile through Android Studio with debugging USB.
- Test the flashlight feature by clicking the button.
- Debug any issues that arise.
If you are interested in implementing admob ads in your Flashlight Android app , please check our How to add admob ads in Adroid App With Easy Step
Conclusion: Creating a flashlight application in Android Studio is a fun and rewarding project for beginners in Android development. This guide provides a straightforward path to building your first app and introduces you to basic app development concepts.