Make WordPress Faster Using W3 Total Cache and Cloudflare
Today, we will cover How to Make WordPress website faster with W3 Total Cache and Cloudflare. If your web hosting server speed is not faster and you’re facing a server speed problem in the Google page speed test. You must use W3 Total Cache and Cloudflare to improve your website page loading speed.
W3 Total Cache
W3 Total Cache is a WordPress plugin that is used to optimize the JavaScript and CSS of a website. It is the most popular plugin to make WordPress website faster. It is the best caching plugin.
Cloudflare
CloudFlare is a content delivery network (CDN) website that provides a free and paid plan and a public SSL certificate in the free plan. Cloudflare is a powerful CDN to speed up your website. You can also watch my YouTube video How to Make WordPress Faster With W3 Total Cache & Cloudflare.
Step 1: W3 Total Cache Setting To Make WordPress Website Faster
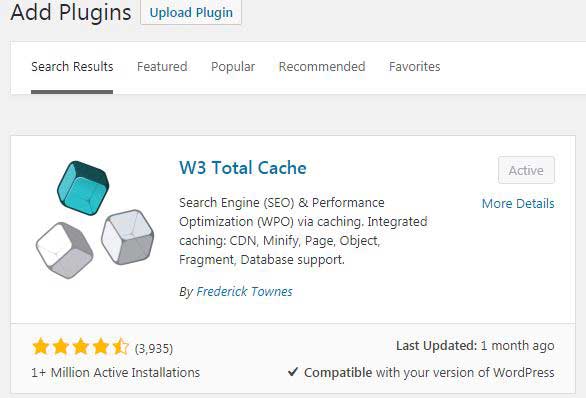
First of all, You need to install W3 Total Cache on your WordPress. Get started by installing and activating the plugin. It’s a free plugin available in the WordPress directory, so you can install and activate it from your WordPress dashboard by going to Plugin > Add New and searching w3 total cache.
W3 Total Cache Configure Setting has two major settings that Make WordPress Website Faster, given below.
General Setting:
Go to the w3 total cache plugin general option. The first option allows you to enable every feature automatically. But you won’t need every feature, so you should not use this option. Don’t tick mark. Toggle all caching types on or off, and don’t click the Enable Preview Mode option.
Page Cache ( Enable ):
Page Cache is an important option of the w3 total cache plugin. You need to enable this option, and for the Page Cache Method, you also need to choose Disk: Enhanced.
General Setting for W3 Total Cache
we will cover general setting options one by one to Make WordPress Website Faster
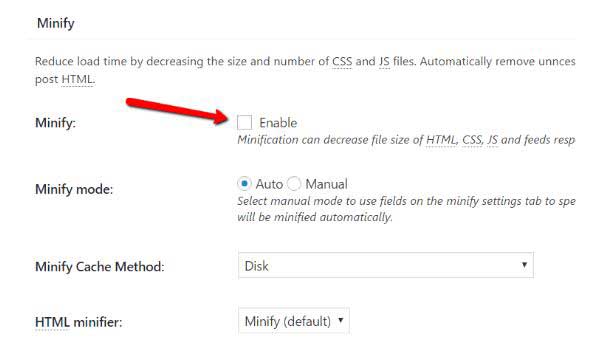
1. Minify (DISABLE):
You don’t need to enable the minify option with w3 total cache because CloudFlare also supports minification. So, I recommend using Cloudflare to minify your website code instead of this plugin. Therefore, you don’t need to enable this option if you want to use Cloudflare.
2. Database Cache (DISABLE):
If you are using a shared hosting package, you don’t need this option because the shared hosting server database can slow down due to overload on a CPU. So, I recommend disabling this option.
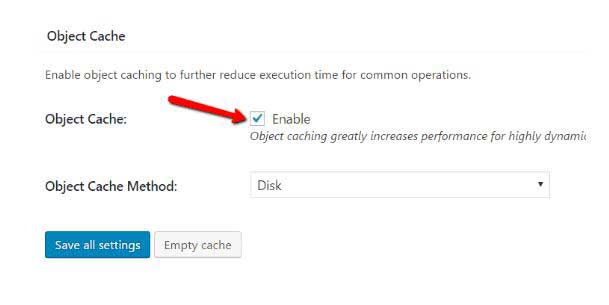
3. Object Cache (ENABLE):
Enable the object cache option and select Disk Method.
4. Browser Cache (ENABLE):
The browser cache increases your website speed by using static resources in your visitor’s used browsers. Therefore, you need to Enable the browser cache option.
5. CDN (DISABLE):
Leave the CDN option to disable because you can not handle CloudFlare from here. This option is used for paid CDNs like MaxCDN. Don’t worry. I will show you how to take CloudFlare to make WordPress website faster from the w3 total cache. We use Cloudflare Extension from this plugin.
6. Reverse Proxy (DISABLE):
Reverse Proxies are an advanced concept that is generally used for private hosting. Therefore, you leave this option Disabled.
7. Monitoring (NO ACTION):
There is no need to monitor your website. Please ignore it.
8. Debug ( DISABLED):
Don’t enable any option from there. Keep Disabled
Step 2: Page Cache Configure Setting
By following that, we can make WordPress Website Faster. The second step is page cache setting; first, go to the page cache option under the general section to ensure these options are enabled.
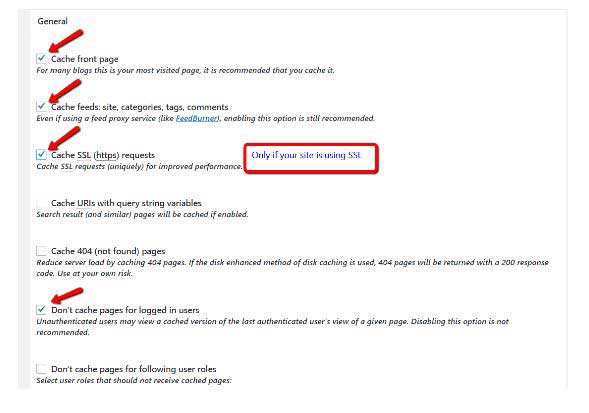
1. General :
- front page (tick mark)
- Cache feeds (tick mark)
- Cache SSL – Cloudflare offers free SSL certificates so that you can enable this box. ( only tick mark if you want to use Cloudflare public SSL certificate)
- Don’t cache pages for logged-in users (tick mark)
Everything leaves default, which is not mentioned above.
2. Cache Preload:
Fill up this section with the following setting to make WordPress website faster.
Automatically prime the page cache: (tick mark)
- Update interval: 900 seconds
- Pages per interval: 10
- Sitemap URL: this option is for your website sitemap.
- Preload the post cache upon publish events: (tick mark)
Other options leave the default.
3. Object Cache Configure Setting
It would be best if you left everything as the default. You need to make sure these options contain the following numbers.
- Default lifetime of cache objects: 180 seconds
- Garbage collection interval: 3600 seconds
4. Browser Cache Configure Setting
Browser cache is major to make WordPress website faster. The browser Cache configures setting is the last option of w3 total cache configures the setting.
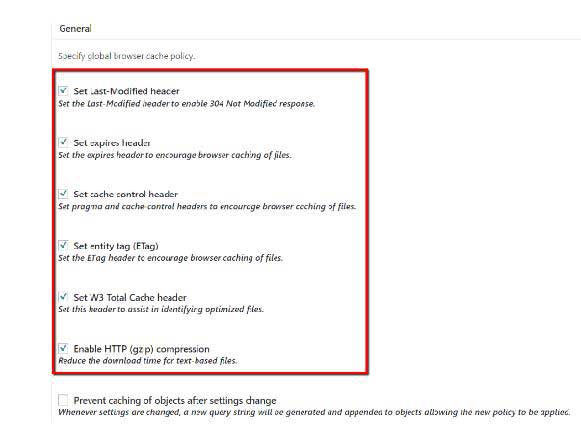
General :
Under the general section, you need to tick mark some additional options and make sure all of these following boxes are checked.
- Last-Modified header: Checked
- expires header: Checked
- cache-control header: Checked
- entity tag (eTag): Checked
- W3 Total Cache header: Checked
- Enable HTTP (gzip) compression: Checked
Please leave all of the other options under Browser Cache as their defaults.
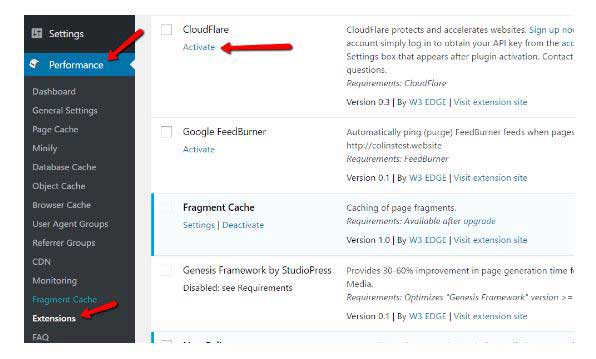
5. W3 Total Cache Configure Setting With CloudFlare Extension
Now, It is time to activate W3 Total Cache and Cloudflare on your website. Therefore, go to the w3 total cache extensions option and activate Cloudflare. After starting the CloudFlare extension, you can move Cloudflare to configure the settings.
Step 3: Cloudflare Setting to make WordPress website Faster
Cloudflare is most important to make WordPress Website Faster; you need a Cloudflare account, which provides us a global API key that will be used to activate Cloudflare with a w3 total cache. Therefore, you need a Cloudflare account. Suppose you don’t have an account on Cloudflare. Then, go to the Cloudflare website and activate your website with Cloudflare DNS. You Can Also watch my YouTube video How To Setup Cloudflare.
After making your CloudFlare account, copy your Global API Key. Come to the w3 total cache extensions option, and click on setting under the CloudFlare extension. Then click the Authorize button under the Credentials. Now, Click the API Key View button and enter your Cloudflare API key. Now you will see your CloudFlare account has been activated with a w3 total cache.
Turn on Cloudflare Minify
Finally, we minify our website code by using Cloudflare. Please Scroll down the Cloudflare settings page, and then you will see an option off CloudFlare: Content Processing. Enable given three options.
Minify JavaScript files. | |
Minify CSS files. | |
Furthermore, If you want to get 99% result, please visit another post, How To Increase Website Speed.